This page is a discussion of the Hyperspace Module and Inter-Stellar Travel.
The Hyperspace Module is designed to handle the movement of the player's fleet through interstellar space (i.e. any movement outside of a star system). Included in this mandate is the ability of the player to keep track of where they are and where they are going through the use of a Sector starmap. The basic architecture of the module is similar to other modules within the game that handle basic data types (such as integers and strings) and hash tables / dictionaries. This module predominantly required by the Starship Module, though because it also handles the spheres of influence of alien species, it is also required by the Encounter Module as a source of data. Without the ability to fly from one star to another, it wouldn't be appropriate to call the game "Starflight"; the module is thus vitally important to the overall concept of the game. All code for the Hyperspace Module is located in the sf3_hyperspace.py file.
Summary Description[]
The player's fleet enters hyperspace anytime they reach the outer boundary of a star system (for more details on the boundaries of star systems, refer to the Inter-Planetary Travel Module discussion) while still in Maneuver mode in the Starship Interface (for details on the interface, refer to the Starship Module). At that time the view in the MVS will change to a view of interstellar space (maintaining the fleet icon in the center of the MVS with the star system the fleet just left represented as a nearby star icon) and the view in AVS2 will change to the ship's alert status (this may be changed out with a local "minimap" or radar similar to the one found in The Lost Colony, if we wish to implement something like that). The player will be allowed to control their ship using a set of steering keys and will maintain use of the Starship Interface throughout. While moving through hyperspace, the game will continually update the ship's position, check for nearby encounters, handle fuel consumption, and allow any ongoing background processes such as repairs or crew treatment. The player will be allowed to access a starmap of the local Sector; use of this map will temporarily suspend the action. It will give the player their current position, the position of any destination set of coordinates input into the map, the distance to that destination point and the estimated amount of fuel required. Should the destination point have a designation, that information will also be provided. Additional information, such as the location of nearby fluxes or encounters, may be provided to the player if they have access to artifacts/technologies that give them such information. While flying, the fleet will travel to the other end of a flux in the event the player's fleet icon makes contact with a flux icon. When it contacts another star icon, the ship will enter that system; the MVS will change to a local "in-system" view and AVS2 will change over to the local system map; the Inter-Planetary Travel Module will be active at that point.
Data Structure of the Sector Object[]
The following list is an indication of the various variables and methods that will be included in a Sector object. This list contains the final variables included in the object. Sector objects are meant to be used as containers for information on star systems (and their associated planets), nebulae, fluxes, and special zones, and are used by the Hyperspace Module, Inter-planetary Travel Module and Planetary Exploration Module specifically to access that information; information contained in Sector Objects is also accessed in-game by the Starship Module (for the Starmap). Sector objects may contain a number of children objects (namely StarSystem, Nebula, Flux, and Zone objects) which are used to contain specific data. While there is no theoretical limit on the number of Sector objects that can be used by the game (owing to how the data is accessed), Starflight III will specifically have three Sector objects (one for each Sector in the game), and only one of these will be active at any given time. Sector objects are meant to be loaded at the game's onset and by the Hyperspace Module when a player passes through an "inter-Sector" flux. Their data structure is as follows:
- Class: Sector
- List: vSystems
- List: vFlux
- List: vNebula
- List: vZones
- List: vHomeworlds
- List: vEncounters
- List: vRoutes
- List: vStarport
- String: szName
Data Structure of the Flux Object[]
The following list is an indication of the various variables and methods that will be included in a Flux object. This list contains the final variables included in the module. Flux objects are meant to be used as child objects of Sector objects, and are used to hold information on specific end-points for fluxes. They are also a sub-class of the SF3Actor class. They have no child objects of their own. Many Flux objects may be included in the game; one is required for each Flux that needs to be located in a specific Sector. They are meant to be loaded along with the remainder of a Sector's data at any point when a Sector object is loaded (at the game's onset, or when the player's ship passes through an inter-Sector flux. Their data structure is as follows:
- Class: Flux
- Class: SF3Actor
- Integer: nXStart
- Integer: nYStart
- Tuple: tEndCoords
- Integer: x-coordinate
- Integer: y-coordinate
- Flag: bOneWay (can the flux be travelled in both directions, or just from the indicated start to the indicated end?).
- String: szDestination (indicates the destination Sector, used for inter-Sector fluxes)
Data Structure of the Nebula Object[]
The following list is an indication of the various variables and methods that will be included in a Nebula object. This list contains the final variables included in the object. Nebula objects are meant to be used as child objects of Sector objects, and are used to hold information on specific areas regarding nebulae (specifically a centerpoint, radius, and type). They are also a sub-class of the SF3Actor class. They have no child objects of their own. Many Nebula objects may be included in the game; one is required for each Nebula that needs to be located in a specific Sector. They are meant to be loaded along with the remainder of a Sector's data at any point when a Sector object is loaded (at the game's onset, or when the player's ship passes through an inter-Sector flux. Their data structure is as follows:
- Class: Nebula
- Class: SF3Actor
- Integer: nXCenter
- Integer: nYCenter
- Integer: nRadius
- String: szType
Data Structure of the Zone Object[]
The following list is an indication of the various variables and methods that will be included in a Zone object. This list contains the final variables included in the object. Zone objects are meant to be used as child objects of Sector objects, and are used to hold information on specific areas regarding special zones (specifically a name used as an identifier for a specific zone, a centerpoint, and a radius). They are also a sub-class of the SF3Actor class. They have no child objects of their own. While there is no restriction on the number of Zone objects that may be included in the game, few should be required. The actual functioning of Zones is meant to be handled through the Event and Plot Handler; a check can be made to see if the player is in contact with a Zone, triggering effects if this is in fact the case. As with nebulae and fluxes, one Zone object is required for each Zone that needs to be located in a specific Sector. They are meant to be loaded along with the remainder of a Sector's data at any point when a Sector object is loaded (at the game's onset, or when the player's ship passes through an inter-sector flux. Their data structure is as follows:
- Class: Nebula
- Class: SF3Actor
- String: szName ()
- Integer: nXCenter
- Integer: nYCenter
- Integer: nRadius
A zone can easily be adapted to serve as a species sphere of influence, though that's not what they were originally intended for; originally, they were meant to be used for areal effects, such as all the humans on a ship going crazy when the ship got too close to the Uhl, or for cordoning off "forbidden" areas that would, if entered without the proper artifact on board, destroy the player's ship.
Interfaces[]
Starmap[]
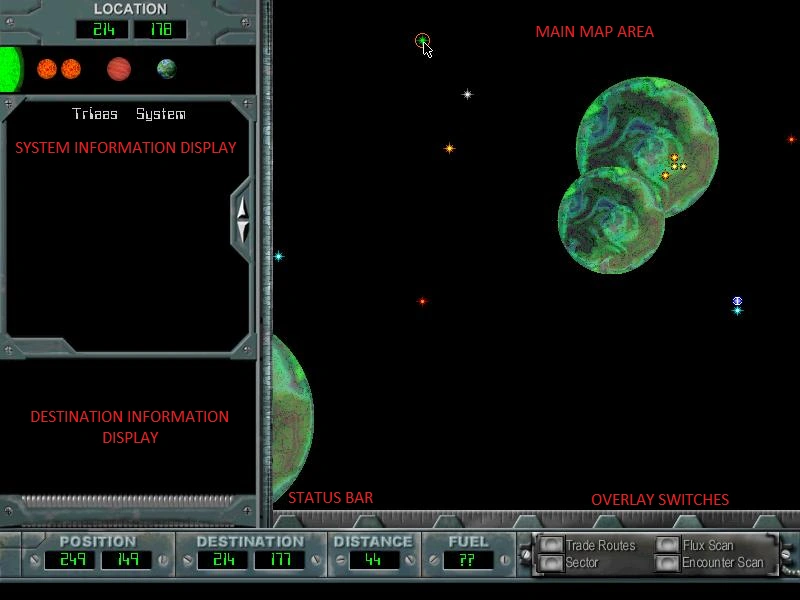
Starmap Interface (Example)
The image for this interface is fairly old at this point, but it is still good enough to cover all of the desired functions of the starmap. Some of the features contained in this discussion, namely the two Information Display areas, may ultimately be dropped from the game.
The Starmap Interface consists of five separate areas, as demonstrated in the graphic:
- Main Map Area
- System Information Display
- Destination Information Display
- Status Bar
- Overlay Switches
The largest and most important of these areas is the Main Map Area, which takes up the entire area on the right two thirds of the screen (with the exception of what's used by the Status Bar and Overlay Switches areas. When first loaded, this area will show the region within 50 hyperspace coordinates of the ship, including all nebulae, known flux trails, and stars (except for those hidden behind nebulae; the player may purchase technologies which will ultimately allow these stars to be displayed). An icon for the player's fleet will also be provided, as well as a circular cursor. The icon representing the player's fleet will remain centered in the view unless doing so would cause part of the map outside the Sector's boundaries to be shown; in that event, the icon will be moved as close to the edge of the view as necessary. Additional overlays may be seen in the Main Map Area when activated by the Overlay Switches; these overlays include the locations of Trade Routes, nearby unknown fluxes, and encounters. The Main Map Area will have four levels of zoom, at 50 coordinates, 100, 150, and Full Sector; zoom levels can be switched via the mouse wheel or by pressing <Ctrl>-<Numpad +> or <Ctrl>-<Numpad -> on the keyboard. While not at full zoom, the arrow keys may be used to move the map view in the direction indicated; when the view scrolls, the cursor will move to the edge of the new area closest to the player's ship. The cursor itself can be moved via mouse click. Pressing the <Enter> key or double-clicking on a point in the Main Map Area sets the indicated point as the ship's destination and activates the autopilot. This will also confirm the usage of a jump pod; upon returning to the Starship Interface, an animation showing the fleet's successful arrival chances will appear in the MVS, followed by the flux animation and a message stating whether or not the fleet arrived at the desired target.
In the top left corner of the screen is the System Information Display, which takes up the upper half of the left third of the screen. This area is generally empty unless the cursor in the Main Map Area has been placed on top of a star system. When a star system has been highlighted, a small map of the system will appear (the star, followed by a representation of the planets in that system in their relative orbital positions, with sizes and types highlighted). Below this area, the name of the system (if one exists) will be highlighted. Clicking on a planet in the minimap may bring up information on that world, which will be displayed immediately below the system's name. This information will appear if and only if the player has visited the planet prior to searching for it. If the planet has a name (such as what may occur if/when the planet is recommended for colonization), that name will appear in the bottom of the area.
The Destination Information Display appears immediately below the System Information Display, sandwiched between it and the Status Bar. The purpose of the Destination Information Display is to provide a quick summary report of fuel requirements and distance to be covered between the fleet's current position and the selected desination, information on that destination point (such as whether or not it contains a flux or star system) and to provide another means by which to activate the autopilot. When a point is selected in the Main Map Area other than the one on which the fleet icon is currently located, the distance to that point and estimated fuel costs are both calculated and displayed. Below that, information on the destination is displayed; this can either be the name of a star system, a star's type, a flux's destination point, or nothing. Once the information is displayed, a single button appears which will engage the autopilot. Clicking on this button engages the autopilot and returns the game to the Starship Interface. This area is obviously redundant, and may ultimately not make it into the game. It probably could be incorporated into the System Information Display.
A narrow strip at the bottom of the screen contains both the Status Bar and the Overlay Switches, with the Overlay Switches taking up about the rightmost 25% of the area. The Status Bar lists the fleet's current coordinates, the coordinates of any selected destination point, the fuel needed to travel from the fleet's current position to the selected destination point (this is left blank if there is no selected destination), and the distance to the selected destination point. If the autopilot is already engaged, an indicator will appear notifying the player to this affect in the Status Bar area. Selecting a new destination point will disengage the autopilot. The player may have no direct interaction with the Status Bar, though the destination they select in the Main Map Area will invariably affect the information that is displayed there.
The Overlay Switches are a series of "buttons" that the player can use to bring up additional information in the Main Map Area. This includes a button for viewing known trade routes, switching between Sector maps, and technologies the player may have acquired (such as the Flux Scan or System Scanner). A button will exist for each technology that will be present in the game; activation and deactivation occurs via a single click on any button (this may also be set to function through the F-keys if we wish, going in order from top to bottom, left to right). The Trade Routes and Sector buttons will always be available to the player. There is no "deactivation" for the Sector button; it simply toggles through the known Sector maps (an area should be provided at the top of the Main Map Area to denote the Sector being displayed. Likewise, a field should be present in the Status Bar for the Sectors of both the source and destination coordinates.). While active, an overlay for the appropriate technology will appear in the Main Map Area, along with a legend for the overlay.
The <Space Bar> may be used at any time to exit the Starmap Interface. Using this method to exit the interface cancels any selected destination point and will not activate the autopilot, and will also cancel the use of a jump pod.
Hyperspace[]

Starship Interface, Fleet in Hyperspace (example)
The hyperspace "interface" is not an interface in the normal manner of interfaces. Rather, it is a specific function of an already defined interface, the Starship Interface. Since travel through hyperspace is a lengthy topic, though, and since it was not discussed under the Starship Module, a discussion of how hyperspace travel will function graphically is warranted. The graphic being used is obviously an older sketch, but once again it is good enough to cover the basic concepts required for the discussion.
As demonstrated in the graphic, hyperspace travel specifically affects three areas of the Starship Interface (for details about the Starship Interface, refer to the discussion under the Starship Module. The affected areas are:
- Main View Screen (MVS)
- Auxiliary View Screen 2 (AVS2)
While hyperspace travel is occurring, AVS2 will be generally inactive, and will either display the ship's current alert status, damage report or crew vitality report based upon the player's actions to that point (when entering hyperspace, the display will default to the alert status display. Likewise, anytime the game returns to the Starship Interface from another interface while the ship is still in hyperspace, the alert status display will be shown). Should one of the other AVS2 displays be selected, it will continue to display updates to the player on the material selected.
The MVS, meanwhile, will show the player's fleet icon in its center. This icon will not leave the center of the screen as the player travels through the system; scrolling motion of the background star field will be used to give the player a sense of motion. When the player approaches a star system, flux, or nebula, the object will appear in the main view screen (zones, however, will remain invisible at all times). Colliding the ship icon with a star icon will sound a tone, cause the message "COMMENCING SYSTEM PENETRATION" to appear in the Message Box, and will cause the Inter-planetary Travel module to engage. Any time the player leaves a star system, their fleet icon will appear with the star system nearby. Colliding the ship icon with a flux icon will switch the MVS to an animation of the ship traveling through the flux, after which the view shifts back to a fleet icon-centered view of local space at the other end of the flux. Provided the flux was two-way, the return flux icon should be visible nearby. "Collision" with a nebula will cause the view to become cloudy; any effects of the nebula activate as soon as the player enters it, and vice versa.
While in hyperspace, the player may collide with encounters. Encounters themselves remain invisible in the MVS, though they may show up on the radar if the player's Technology score is above 50; this will be accompanied by a message saying "MOVEMENT DETECTED AT (x)X BY (y)Y.", where x and y indicate how far away the encounter is along the two axis. The higher the Technology score, the further away encounters will be detected. Colliding with an encounter engages the Tactical Interface (the player will "drop out of hyperspace" in the process; the player will return to hyperspace upon termination of the encounter.
Maneuvering utilizes the set of keys indicated for Maneuver mode while the Starship Interface is active; the arrow keys, WASD keys, and numeric keypad may all be utilized to maneuver the fleet around. While in orbit, the normal set of keys and mouse clicks that apply to the Starship Interface will be activated. For more information, see the discussion under the Starship Module. The player may use either the <Space Bar> or the <Enter> key to drop out of Maneuver mode as usual.
General Procedures and Notes[]
General Hyperspace Travel Procedure[]
A floating point count will be needed to keep track of the distance travelled. The gameClock object will also be involved in keeping track of events in hyperspace (see the discussion under the Event and Plot Handler Module for details.) The check for distance will need to be added to Panda3D's task manager, returning task.cont while the ship remains in hyperspace. The distance travelled will be zeroed out when the ship enters an encounter or a star system (but will not be reset when the starmap is used).
- Has a full unit of distance been covered? (Fluxes do not add to or reset the distance measured in a transit)
- NO: Continue
- YES: Subtract amount from fuel based on the chart below. Be sure to account for Navigator's Astropiloting score (every 20 points increases efficiency by one level).
- Has an hour passed?
- NO: Continue. Add distance traveled to total hyperspace distance traveled.
- YES: Can the ship have an encounter this hour? (Make a d100 roll and add the total distance traveled to the result. If the final number is greater than the Navigator's effective Stealth score, an is encounter indicated)
- NO: Continue.
- YES: Generate an encounter (see details in the discussion under the Encounter Module).
| Engine Efficiency | Distance per m3 | Fuel used per coordinate (unit) |
|---|---|---|
| 5% | 2.083 | 0.48 |
| 10% | 2.632 | 0.38 |
| 15% | 3.448 | 0.29 |
| 20% | 4.762 | 0.21 |
| 25% | 6.250 | 0.16 |
| 30% | 9.091 | 0.11 |
| 35% | 11.111 | 0.09 |
| 40% | 14.286 | 0.07 |
| 45% | 16.667 | 0.06 |
| 50% | 20.000 | 0.05 |
| 60% | 25.000 | 0.04 |
| 70% | 33.333 | 0.03 |
| 80% | 50.000 | 0.02 |
| 90% | 100.000 | 0.01 |
| 100% | 200.000 | 0.005 |
In situations where the basic assumptions about space terrain and weather are not true, the numbers for a lower engine efficiency may be used (nebula travel makes this assumption). The 5% level is the lowest possible level; if the 5% level is already indicated and further decreases are also indicated, ignore them.
Ship speed will need to be tested in game. At this time, a rate of one coordinate per engine class per hour is desired (i.e. a Class One Engine will travel at one unit per hour, a Class Two Engine at two units per hour, a Class Three Engine at three units per hour, and so forth). The speed of the player's fleet will be limited by the slowest ship (i.e. lowest Engine class) present.
Radar[]
In a small circle placed to the side of the screen a radar style map view shows the the nearby area of hyperspace larger than the local view. Stars are displayed as large bright circles on this map, either flickering moving red dots or actively moving dots represent alien ships. Nebulae show up as grayish circular areas of space which completely conceal anything inside of them. The radar map view displays no details inside the nebulae, either ships or stars. Continuum fluxes do not show up on this map, only the local view and the starmap. Debating as to whether or not to put detected fluxes on the radar; I know that finding fluxes in TLC has been a royal pain in the ass precisely because they don't show up on the radar.
Interface MVS[]
Stars[]
From hyperspace all stars will appear to be different colors and sizes, reflecting their stellar class. Class M and K stars will use a small star graphic, class G, F and A stars will use a medium sized graphic, and class B and O stars will use a large sized graphic. Each graphic will be colored as appropriate to the star's type, following the conventions established in the first two Starflight games, as per the following table:
| Luminosity Class | Color |
|---|---|
| O | Dark Blue |
| B | Light Blue |
| A | Green |
| F | White |
| G | Yellow |
| K | Orange |
| M | Red |
Entering a star system will place the players ship on the same side of the solar system as the side he/she entered it. Leaving a star system also makes the player face that direction in hyperspace away from the star. Only the eight cardinal points are used for these direction angles.
Nebulae[]
Nebulae are areas of space filled with gas and dust. There are five basic types of nebulae in the game:
- Normal: No additional effects.
- Dense: In addition to the normal effects, all ships travel at half speed and at an additional step down in fuel efficiency.
- Damaging: In addition to the normal effects, all ships in the player's fleet sustain 1d5*100 points of damage per hour.
- Radioactive: In addition to the normal effects, all crew take the POISONED condition and lose 5 HP per hour while inside the nebula.
- Haven: In addition to the normal effects, weapons systems are deactivated and shields recharge at double the normal rate.
All nebulae interfere with the functioning of sensors and normal shields (nebula shields, however, are not affected by nebulae; the trade off is that they usually have a lower shield hit point value than normal shields of the same class), and decrease fuel efficiency by one level (to the minimum level of 5%). Encounters, star systems, and planet views inside of a nebula should all have the nebula screen background and restrictions to visual range/sensors and interference with shields. Only while in hyperspace will any damage occur from the nebula's type.
Fluxes[]
A flux (also known as a continuum flux) is a wormhole in space that has the appearance of a black hole with an accretion disk of highly colorful gases. A flux is difficult to detect in hyperspace and will only be visible on the local view depending on the Navigator's skill (again, debating as to whether or not to stick it on the radar as well). If the Navigator has less than 200 points in their overall Navigation Discipline or less than fifty points in their Astrogation skill, they will remain invisible. Between Navigation Disipline levels of 200 to 250 / Astrogation skill levels of 50 to 100 the range in which a flux is detected increases. After a flux has been found, a small gray X will appear on the radar from that point on to represent its position. A ring device or flux scan will extend the detection of a flux to the entire local view screen, and will eliminate the chance of the Navigator getting lost after traveling through one.
Most of the time a flux has two entrances, and the player enters one of them, the player can return to the original position by reentering the flux. Some of the time a flux will be a one-way trip, some of the fluxes will have multiple possible exits, and other times they will put the player into a completely different Sector (known as an "inter-sector" flux). Traveling through a flux simply requires the player to collide with it with their fleet icon. A water tunnel-like, pre-rendered animation will play while a player is traveling through any flux. The fleet will emerge at at a random set of sub-coordinates adjacent to the destination coordinates of the flux. An Astrogation check is then made to see if the player's fleet is lost.
After travelling through a flux, the game will make a DC 125 Check of the Navigator's Astrogation skill to determine if the fleet has become lost. Should the Check fail, the game will scramble the ship's coordinates as they are displayed to the player (a set of incorrect coordinates are displayed which change at random anytime the ship moves) and a new Check will be made after a game hour has passed, with the Check's DC decreasing by 10. Checks are required until the Navigator is successful, at which point the proper coordinates will be displayed.
Spheres of Influence/Dynamic Universe[]
Unlike solar systems hyperspace encounters are determined by probability instead of being set. Encounters may appear anywhere but most of the time an encounter with a given race will be most likely inside their sphere of influence. These spheres typically will roughly encircle the race's home world, but can sometimes have different center points or move due to in-game events. Spheres of influence may partially or completely envelop other spheres of influence. The sphere of influence (titled with a unique color and name the alien race) will appear on the starmap after the player has an encounter with the race in question (provided they actually possess a sphere of influence).
When the player's fleet encounters an alien fleet, the message "SCANNERS DETECT UNIDENTIFIED OBJECT" appears, the ENCOUNTER ALARM tone sounds, an animation is played (perhaps of the players ship shrinking or a pure black area of space growing over the local view map, etc.) and the Tactical Interface engages. When the player leaves the encounter the animation is played in reverse, with the Starship Interface re-engaging. In both cases the animation takes "time" in which alien ships can move and the player cannot.
A check will be made weekly (in game-time) to see if any adjustments are needed to the currently existing set of spheres of influence. For each race in the game, the game will tally up the number of undisputed star systems (ones that the species alone controls) currently in the sphere as well as the number of ships of that race the player has destroyed in the past week (with each system adding .01 to the count and each ship subtracting .01 from the count). This count is then multiplied by a "relative strength factor", which is calculated by multiplying the general SI of that race's scout class by .03, warship SI by .02, and transport SI by .02, and then adding the resultant amounts together. The result of this calculation from the previous week is subtracted from the result for the current week, and then the radius is adjusted in length by the final amount (it grows if it's positive and shrinks if it's negative). A sphere of influence may not grow more than twice its initial size during the course of the game (nor can it shrink past half of its initial size) without such changes being specifically scripted in the Event Handler. Changes in the location of the centerpoint of the SOI must also be scripted, with movement rates for the SOI about 1/10th of the the normal speed of the slowest class of ship in the species' possession.
Starmap[]
Alien spheres of influence and continuum fluxes are also displayed but only after they are discovered by the player. The total distance that the ship can travel is displayed as a lightly colored gray sphere around the player's current position. The bottom of the screen also has tabs for displaying other sectors, hidden until they are traveled to. The player can scroll the map by either clicking to "grab" the map and pull it one direction or another, zoom in smoothly in and out with the plus and minus keys or the mouse wheel, or can move the mouse to the edge of the screen to slowly scroll the entire map in that direction.
In an unexplored Sector (and maybe also the distant corners of an explored Sector) the starmap should contain no details and only be revealed in a "fog of war" style fashion within a 30 sector radius of where the ship has traveled. This encourages exploration of the entire Sector, gives a visual representation of where the ship has been and where it has yet to travel to. Visited stars are shown in a brighter hue than unvisited stars. When the mouse is moved over a visited star system then a small box with a list of planets appears. Each planet shows a mini icon representative of the planet's color as seen from the solar system, bio density, mineral density, and another mini icon if the planet is inhabited. If the planet was orbited then all of these details are filled in. If not then only the planet's many icons are visible and the word unknown appears next to them. If the system scanner is used inside the solar system then all planets will have their details filled in.
Methods[]
(use this area to list the module's methods and give a description of what the method does. As the methods are written, what they do should be written out procedurally)
No specific methods are planned for this module at this time. It is likely that some will need to be added at a future date, however, to give functionality to the starmap and to transition the player's fleet between hyperspace, inter-planetary space, and encounters.
XML[]
The Sector object, like most of the other objects in the game, is largely XML driven; this will help keep it flexible up until SF3's design is finalized. The same can also be said for Star_System, Flux, Nebula, Zone and Planet objects (i.e. whole Sectors, stars, planets, fluxes, nebulae, and zones can be added and removed from the game freely, based upon what data is available in the XML files). All of these various objects are handled by a single type of XML file, which contains all the hard data on these objects (the file type "(sector_name).xml"). The following briefly goes over what data is contained in this XML file type.
(sector_name).xml[]
The file type "(sector_name).xml" is designed as an entry of all stellar and planetary objects located within the confines of a Sector. This file type is utilized by both the Hyperspace Module and the Planetary Exploration Module, but for varying purposes. Its discussion is included as part of this module as this module makes greater use of the file type. The root element of these files is called "world", under which is a "sector" sub-element with the "id" of the Sector (its name) as its only attribute. The sector element may have multiple empty element entries under it from the following categorical sub-elements:
- star: Used for star-systems. Star systems may contain any number of "orbit" elements, as well as the following mandatory attributes:
- class: Denotes the luminosity class of the star, which in turn sets its color. Valid values for the attribute are "O', "B", "A", "F", "G", "K", and "M".
- position: Denotes the star's location in hyperspace, listed as a single x-coordinate followed by a single y-coordinate.
- orbit: Used specifically for planets. Orbit entries may have the following attributes.
- orb: Mandatory. Denotes the orbital lane in which the planet is located. Must be an integer.
- sfc: Mandatory. Denotes the planet's type. This must have a value of "Rock", "Liquid", "Frozen", "Molten", or "Gas Giant"
- mass: Mandatory. Denotes the planet's mass in kilograms. Must be in scientific notation with two decimal points and three places in the superscript value (i.e. it must be of the form "x.xxe+xxx").
- bio: Mandatory. Denotes the planet's biomass percentage. Must be an integer value from 0 to 100.
- min: Mandatory. Denotes the planet's mineral density percentage. Must be an integer value from 0 to 100.
- atmo: Mandatory. Lists up to three major components of the planet's atmosphere, separated by commas. Planets without atmospheres have a value of "None".
- hydro: Mandatory. Lists up to three major components of the planet's hydrosphere, separated by commas. Planets without hydrospheres have a value of "None".
- litho: Mandatory. Lists the three most common minerals found on the planet, separated by commas. All planets have a lithosphere.
- grav: Mandatory. Denotes the planet's surface gravity. Must be a two-decimal float.
- rho: Mandatory. Denotes the planet's atmospheric density category. Must have a value of "Not Applicable", "Very Thin", "Thin", "Moderate", "Thick" or "Very Thick"
- atp: Optional. Not used in SF3. Denotes the planet's average surface atmospheric pressure, in atmospheres. Must be a two-decimal float.
- temp: Mandatory. Denotes the planet's surface temperature range.
- wx: Mandatory. Denotes the planet's categorical weather severity. Must have a value of "None", "Calm", "Moderate", "Violent" or "Very Violent".
- hoh: Optional. Denotes the amount of the planet's surface covered by the hydrosphere. Must be an integer with a value from 0 to 100.
- value: Mandatory. Denotes the planet's value if recommended for colonization. Must be an integer. Positive values indicate a bonus; negatives indicate a fine.
- dist: Optional. Lists the distance of the planet from its primary in AUs. Must be a three-decimal float. Not used in SF3.
- prho: Optional. Not used in SF3. Denotes the planet's overall density, in multiples of Earth densities. Must be a one-decimal float.
- year: Optional. Not used in SF3. Denotes the length of the planet's year, in days. Must be a one-decimal float.
- day: Optional. Not used in SF3. Denotes the length of the planetary day, in hours. Must be a one-decimal float.
- ecc: Optional. Not used in SF3. Denotes the eccentricity of the planet's orbit. Must be a three-decimal float.
- tilt: Optional. Not used in SF3. Denotes the planet's axial tilt. Must be an integer between -180 and 180.
- diameter: Optional. Not used in SF3. Denotes the average planetary diameter, in kilometers. Must be a one-decimal float.
- flux: Used for fluxes. Flux entries may have the following attributes:
- class: Denotes whether the flux is local or inter-sector. Must have a value of "local" or "inter-sector". Inter-sector fluxes must have only one entry in their end_pos attribute and must include the end_sector attribute.
- start_pos: Denotes the source location of the flux, listed as a single x-coordinate followed by a single y-coordinate.
- end_pos: Denotes the potential destination locations of the flux. If the flux is an inter-sector flux, it is listed as a single x-coordinate followed by a single y-coordinate of a position in the destination Sector. If the flux is a local flux, destination locations are listed as a list of tuples separated by commas, with each tuple containing a single x-coordinate, a single y-coordinate, and an indication of if the flux is one-way or not (a value of "yes" or "no", with "yes" indicating a one-way flux).
- end_sector: Denotes the name of the destination Sector of the flux. This value is mandatory if the value of the class attribute is "inter-sector", and should be absent otherwise.
- nebula: Used for nebulae. Nebula entries must have the following mandatory attributes:
- center: Denotes the nebula's center point, listed as a single x-coordinate followed by a single y-coordinate.
- radius: Denotes the nebula's radius in units of hyperspace coordinates.
- type: Denotes the nebula's type. Can have a value of "normal", "dense", "radioactive", "haven" or "damaging". If missing, the nebula will default to the "normal" type.
- zone: Used for zones. Zone entries must have the following mandatory attributes:
- center: Denotes the zone's center point, listed as a single x-coordinate followed by a single y-coordinate.
- radius: Denotes the zone's radius in units of hyperspace coordinates.
All entries under the sector sub-element will, in general, have an "id" attribute as well; this is a holdover from an earlier version of the game, is completely optional, and is not planned to be used by any aspect of the game.
Sample structure of the (sector_name).xml file:
<?xml version="1.0" encoding="UTF-8"?>
 <world>
  <sector id="beta">
   <star id="0" class="A" position="0,174">
    <orbit orb="3" sfc="Molten" mass="3.73e+024" bio="0" min="50" atmo="Methane, Ammonia" hydro="None" litho="Lead, Titanium, Tin"
     grav="0.86" rho="Moderate" atp="0.77" temp="Searing to Inferno" wx="Calm" hoh="0" value="-15000" dist="26.683" prho="1.0" year="3593.0"
     day="2.0" ecc="0.000" tilt="29" diameter="10890.7" />
   </star>
   <flux id="0" class="local" start_pos="1,70" end_pos="(254,128, no)" />
   <flux id="0" class="inter-sector" start_pos="131,111" end_pos="251,18" end_sector="alpha_expanded" />
   <nebula id="0" center="2, 54" radius="6" type="Dense" />
   <zone id="0" center="215, 200" radius="4" />
  </sector>
 </world>
Module Status[]
This is current as of July 8, 2011.
This module is currently in the final design phases; while specific descriptions of the intended functions of modules have yet to be written, the remainder of the module's basic description is complete at this point. Further design work on this module has been frozen for the time being, and will remain so until I'm ready to begin method descriptions for all remaining extant modules. This module is definitely going to need tweaking, particularly since we haven't defined any methods to go in it at this time. Still, what's here should be sufficient for the design team to proceed when the time comes to implement hyperspace travel.
NEXT: Inter-Planetary Travel Module
PREVIOUS: Starship Module and Interface
TOP